Tag: Programming (Page 1 of 2)

Launch Your Android App Using Your Website URL

You have a website and an android application and you want it so that an android user will be redirected to the application once they open a link from their email. Good thing android have an easy way to do this using Intents and Intent filters.

The first step is to add an information in your applications AndroidManifest.xml to tell the system that you want to received an intent regarding opened links. Open your AndroidManifest and add the following under the activity that you want to receive the intent.

<activity
 android:name=".MainActivity">
 <intent-filter>
 <action android:name="android.intent.action.MAIN" />
 <category android:name="android.intent.category.LAUNCHER" />
 </intent-filter>
 <intent-filter>
 <action android:name="android.intent.action.VIEW" />
 <category android:name="android.intent.category.DEFAULT" />
 <category android:name="android.intent.category.BROWSABLE" />
 <data android:scheme="http" android:host="www.jamesbaltar.com"/>
 </intent-filter>
</activity>

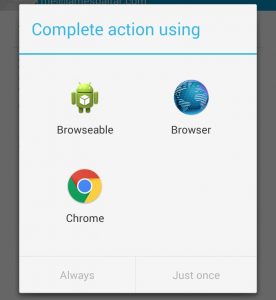
What this does is tell android that your activity can handle and process links that was opened by users. Now everytime a user opens a link to www.jamesbaltar.com a popup window will appear showing a list of applications that can process the link this includes browsers installed, your application and some application that have also registered for this.

Continue reading

MySQL Procedure To Upper Case Table Names

Ever had an experience where you needed to rename a handful of table name into upper case. Below is a procedure to rename all tables into upper case in the current MySQL database/schema.

DELIMITER $$
 
DROP PROCEDURE IF EXISTS `PROC_TABLE_NAME_TO_UPPER_CASE`$$
 
CREATE PROCEDURE `PROC_TABLE_NAME_TO_UPPER_CASE`()
BEGIN
 DECLARE tbname TEXT DEFAULT ;
 DECLARE no_res INT DEFAULT 0;
 DECLARE cur CURSOR FOR
 SELECT t.table_name
 FROM information_schema.tables t
 WHERE t.table_schema = DATABASE() AND t.table_type=BASE TABLE;
 DECLARE CONTINUE HANDLER FOR NOT FOUND SET no_res = 1;
 
 OPEN cur;
 
 rnloop: LOOP
 FETCH cur INTO tbname;
 
 IF no_res = 1 THEN
 LEAVE rnloop;
 END IF;
 
 SET @s = CONCAT(RENAME TABLE `, tbname , ` TO ` , UPPER(tbname), ` );
 PREPARE stmt FROM @s;
 EXECUTE stmt;
 END LOOP;
 
 CLOSE cur;
 
END$$
 
DELIMITER ;

Just run the script and call it using

CALL PROC_TABLE_NAME_TO_UPPER_CASE();

then it will rename the tables. Be reminded though that you need to specify the database to be used before connecting to MySQL or by using the use command.

Read String Console Input Including Spaces Safely In C

Reading a string input with spaces in between words can be tricky. There are two functions you can use here its scanf() and fgets(). Both can be used to read in strings from console safely. By safe I mean not overflowing your buffer.

Using fgets()

This is the common way of retrieving input including spaces safely.

#include 
 
int main( int argc, char* argv[] ) {
 char buffer[1024];
 
 printf( "Please enter a string: " );
 fgets( buffer, 1024, stdin );
 printf( "You entered: %s", buffer );
 return 0;
}

Using scanf()

This is the one I prefer to use over fgets(). Continue reading

CodeIgniter: Remove index.php From URL With The Project Mounted On A URL

If your CodeIgniter project is mounted on URL that looks like

http://www.example.com/codeigniter-project/

and you want to remove the index.php so that your URL to a some page example a blog page will look like this

http://www.example.com/codeigniter-project/blog/view/1

instead of

http://www.example.com/codeigniter-project/index.php/blog/view/1

Then first you need to make sure that mod_rewrite is enabled in your apache by typing this in the terminal:

sudo a2enmod rewrite
sudo service apache2 restart

Then in your CodeIgniter installation folder add an .htaccess containing this:

 RewriteEngine on
 RewriteCond $1 !^(index\.php|resources|robots\.txt)
 RewriteCond %{REQUEST_FILENAME} !-f
 RewriteCond %{REQUEST_FILENAME} !-d
 RewriteRule ^(.*)$ index.php/$1 [L,QSA]

The last thing you need to do is make sure that in your config.php index_page is blank:

 $config[index_page] = ;

Access Django Development Server Remotely

By default Django development server will only be accessible through the local machine(127.0.0.1). If you want to access the server remotely then you need to run the the development server with your IP as an argument:

python manage.py runserver [your-ip-here]:8000

Change the “[your-ip-here]” to your actual IP. If you IP address is 174.143.2.123 then you will need to run the server using this:

python manage.py runserver 174.143.2.123:8000

If you have multiple network configured or you want the server to be automatically available on what your IP now currently is. Then enter 0.0.0.0 as your IP, like this:

python manage.py runserver 0.0.0.0:8000

This will bind the development server of Django on all available network/IP address. Then you will the see same message when you use just use python manage.py runserver  upon successfully creating the server but instead of http://127.0.0.1:8000/ you will see a http://0.0.0.0:8000/, then you will now be able to access your server remotely.

Validating models...
 
0 errors found
February 01, 2014 - 10:13:18
Django version 1.5.1, using settings mysite.settings
Development server is running at http://0.0.0.0:8000/
Quit the server with CONTROL-C.

Warning: This server is only meant for development use so you must not use this as a production solution. This is also discouraged by Django team.

Android: Using An Adapter For Dynamic ListView

This a continuation of my Android: Using An Adapter For ListView post. So please read that first you if haven’t done yet. The projects files for this tutorial is also there.

Adding The Dynamic Functionality

To add the dynamic functionality for the ListView we will need to add 2 functions for adding and removing items in our class that implemented the BaseAdapter. For the function of adding strings:

public void addString( String val ) {
 m_data.add(val);
 notifyDataSetChanged();
}

Aside from just normally adding the string to our data container called m_data. We are also calling the notifyDataSetChanged(), this function will notify the View where are our Adapter is connected. For this instance we will notify the ListView that the underlying data has changed and it must refresh its display/content.

Removing items is also the same, we will remove it normally from the List and notify the ListView of the changes done on the data.

public boolean removeString( int location ) {
 if ( location >= m_data.size() ) {
 return false;
 }
 m_data.remove(location);
 notifyDataSetChanged();
 return true;
}

We also added the location of the item that we need to remove. The important part of these 2 function is the line where we call the notifyDataSetChanged() since without calling it your view will not refresh and show the changes you’ve done.

Android: Using An Adapter For ListView

Creating A Custom Adapter

To use an Adapter with a ListView you must first extends an Adapter.

 class MyAdapter extends BaseAdapter {

Create a List member for the data container.

List<String> m_data = ArrayList<String>();

m_data will contain all string items that you will want to be displayed in the ListView. So in our constructor we will populate m_data with the strings we want to be shown.

 public MyAdapter() {
 m_data.add("item 1");
 m_data.add("item 2");
 m_data.add("item 3");
 }

Continue reading

Making Python Datetime Timezone Aware For Django

To make a Python Datetime timezone aware for Django Datetime field. You can use the utc from django.utils.timezone for replacing the tzinfo of Python Datetime but make sure that it is in UTC format. Below is a simple example of how to retrieve the current date and time and make it timezone aware for Django Datetime model field.

from django.db import models
from django.utils.timezone import utc
import datetime 
 
class Foo( models.Model ): 
 #datetime field sample 
 date_posted = models.DateTimeField( auto_now_add=True, blank=True ) 
 def save(self, *args, **kwargs): 
 #the datetime generated by datetime module will now be timezone aware 
 self.last_date_updated = datetime.datetime.utcnow().replace(tzinfo=utc) 
 super(Foo, self).save(*args, **kwargs)

Compiling OGRE3D for Android

Update: 2015-02-18 – ndk version

You can now compile OGRE3D using NDK and the OGRE branch version 1.9. Ive followed the instruction in OGRE wiki for compiling for Android but got stuck several times in several areas and almost just give up. Im new to Android specially using the NDK and all of this just overwhelmed me. So this is a step by step guide Ive decided to make on how to compile OGRE for people that are like me, new to Android.

Requirements:

Continue reading

Django 1.5 Upgrade From 1.4 Problem On DEBUG=False

Ive upgraded the Django version Im using to 1.5 from 1.4.5 several days earlier and since then I was unable to run my app in release mode. Whenever I set DEBUG=False in settings.py a “HTTP Error 500” page is always served but setting it to DEBUG=True will make the app run fine.

Ive found out that now on version 1.5, Django has a new setting in settings.py:

# Hosts/domain names that are valid for this site; required if DEBUG is False
# See https://docs.djangoproject.com/en/1.5/ref/settings/#allowed-hosts
ALLOWED_HOSTS = []

This setting is not included in version 1.4 and is now needed in 1.5. You need to add your domain here ex: www.jamesbaltar.com. See this link for more

« Older posts

© 2024 James Baltar

Theme by Anders NorenUp ↑