Creating A Custom Adapter
To use an Adapter with a ListView you must first extends an Adapter.
class MyAdapter extends BaseAdapter {
Create a List member for the data container.
List<String> m_data = ArrayList<String>();
m_data will contain all string items that you will want to be displayed in the ListView. So in our constructor we will populate m_data with the strings we want to be shown.
 public MyAdapter() {
 m_data.add("item 1");
 m_data.add("item 2");
 m_data.add("item 3");
 }
Then you must implement the methods getCount(), getItem(), getItemId() and getView().
getCount() must return the number of items that are currently in the Adapter. To do so we can just return the size of the member m_data.
@Override
public int getCount() {
 return m_data.size();
}
For getItem(), this must return an Object and accepts an integer parameter for the location of the item. This means that we can use this later in our code to get the data of the item we want but you can also return a null value here.
 @Override
 public Object getItem( int position ) {
 return m_data.get(position);
 }
getItemId() must return the id for the item in a given location. For the Adapter we have we can also return the location as an Id if you have already an Id for a given item then you must return it here.
 @Override
 public long getItemId( int position ) {
 return position;
 }
getView() this one is where we will return the View that we want to show to the user. We can use a layout then inflate it here. For the layout, we will create one with only a TextView where we can show the String we have for that position from our m_data.
then for our getView() we will inflate the layout then set the String and return it for rendering.
@Override
public View getView(int position, View convertView, ViewGroup parent) {
 View v = LayoutInflater.from( parent.getContext() ).inflate( R.layout.list_view_item, parent, false );

 TextView tvText = (TextView)v.findViewById( R.id.textView1 );
 tvText.setText( m_data.get(position) );

 return v;
}
After creating your Adapter for the ListView you can use the setAdapter() to make the ListView use your custom Adapter.
//after initializing the application in the onCreate()
MyAdapter mA = new MyAdapter(); //create an instance of your Adapter

ListView lv = (ListView)findViewById(R.id.lv1); //retrieve the instance of the ListView from your main layout
lv.setAdapter( mA ); //assign the Adapter to be used by the ListView
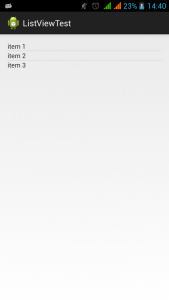
Running this in your device should look something like this:

Optimizing The Adapter
Currently on our implementation of getView() everytime a new item will be shown in the ListView we will create/inflate a new layout. Depending on what you are displaying this can be a big overhead and to minimize this we can use the 2nd parameter. The 2nd parameter is the view returned to us by the system that we can recycle instead of creating a new instance but theres a catch since this might be set to null if there are no views that can be recycled.
@Override
public View getView(int position, View convertView, ViewGroup parent) {
 if ( convertView == null ) {
 convertView = LayoutInflater.from( parent.getContext() ).inflate( R.layout.list_view_item, parent, false );
 }

 TextView tvText = (TextView)convertView.findViewById( R.id.textView1 );
 tvText.setText( m_data.get(position) );

 return convertView;
}
As you can see we are checking if the convertView is null. If it is then we must create a new instance of the view. You can download the sample project files from here.
Next: Android: Using An Adapter For Dynamic ListView
Leave a Reply